Cài đặt:
#https://helm.sh/docs/intro/install/
curl -k -O https://get.helm.sh/helm-canary-linux-amd64.tar.gz
tar -xvzf helm-canary-linux-amd64.tar.gz
cd linux-amd64/
mv helm /usr/bin/
chmod 755 /usr/bin/helm
#Bash Complete for helm
yum install bash-completion -y
helm completion bash > /etc/bash_completion.d/helm
Thoát session ssh và vào lại
P1: Làm quen Helm Chart
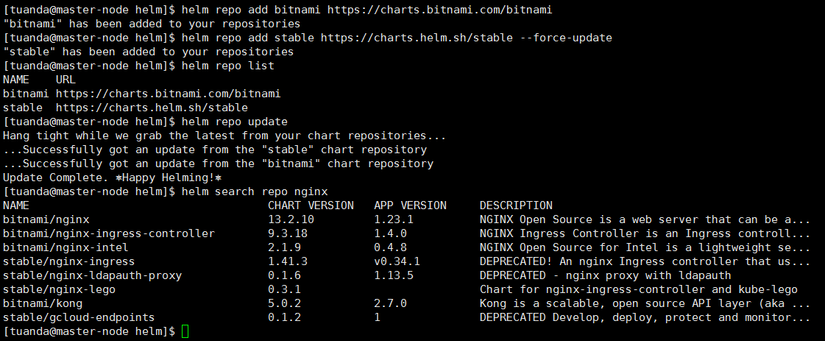
# Add Repo
helm repo add bitnami https://charts.bitnami.com/bitnami
helm repo add stable https://charts.helm.sh/stable --force-update
(Note: khi add repo, helm sẽ tạo file config tại ~/.config/helm/repositories.yaml)
helm repo list   #(liệt kê repo)
helm repo update   #(cập nhập repo)
helm search repo nginx   #(search nginx từ các repo đã add)
1.1 Tải helm chart từ ArtifactHub
https://artifacthub.io/ chứa rất nhiều helm được chia sẻ từ cộng đồng.
helm pull bitnami/nginx
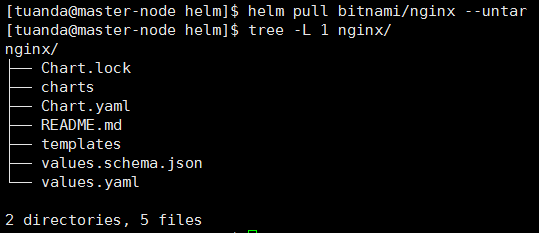
helm pull bitnami/nginx --untar
1.2 Run helm chart
- Chạy helm trực tiếp từ repo internet
# helm install first-chart1 bitnami/nginx -n tuanda --create-namespace
# helm ls -A

- Chạy helm từ folder đã pull về
# helm pull bitnami/nginx --untar
# cd nginx
# helm template first-chart2 . --namespace=tuanda  #(Kiểm tra helm)
# helm install first-chart2 . --namespace=tuanda --create-namespace  #(install nginx bitnami)
# helm ls -A

- Xóa helm chart
helm status first-chart2 -n tuanda
helm uninstall first-chart2 -n tuanda
1.3 Test Chart
Ta có 3 cách kiểm tra config helm đã đúng chưa:
cd nginx
helm template .
helm lint .
helm install nginx . --dry-run --debug
1.4 Show thông tin của chart trên ArtifactHub
helm show chart bitnami/nginx
helm show values bitnami/nginx
1.5 Liệt kê chart nào đang chạy
helm ls -n tuanda   #(-n là namespace)
helm ls -A
P2: Tự tạo Helm Chart
2.1 Tạo self chart
# helm create nginx-test2

> Cấu trúc thư mục helm như sau:
├── charts
├── Chart.yaml
├── templates (chứa toàn bộ thông tin yaml để deploy k8s)
│   ├── deployment.yaml (Chứa deployment k8s)
│   ├── _helpers.tpl (chứa teamplate / include)
│   ├── hpa.yaml
│   ├── ingress.yaml
│   ├── NOTES.txt
│   ├── serviceaccount.yaml
│   ├── service.yaml
│   └── tests
│       └── test-connection.yaml
└── values.yaml (chứ tham số để thay vào file yaml trong thư mục template)
2.2 Upgrade Chart
Nếu Chart yaml có update (ví dụ thêm biến ở configmap, thay đổi image deployment), ta chạy như sau:
helm template nginx-test2 . --namespace=tuanda
helm install nginx-test2 . -n tuanda

#Ta tăng số pod lên 5 và thử chạy upgrade
(vim values.yaml và sửa replicaCount: 5)
helm upgrade nginx-test2 . -n tuanda
2.3 Rollback Chart
$ helm history nginx-test2 -n tuanda
REVISION	UPDATED                 	STATUS    	CHART            	APP VERSION	DESCRIPTION
1       	Sat Oct 15 10:57:24 2022	superseded	nginx-test2-0.1.0	1.16.0     	Install complete
2       	Sat Oct 15 10:59:37 2022	deployed  	nginx-test2-0.1.0	1.16.0     	Upgrade complete

$ helm rollback nginx-test2 -n tuanda (về bản trước đó)
$ helm rollback nginx-test2 1 -n tuanda (về bản chỉ định)
P3: .Values / .Chart
Để chuẩn bị cho các bài test từ phần 3,4... trở đi, ta thực hiện xóa vài thư mục sau
helm create nginx-test3
cd nginx-test3
rm -rf templates/*
cat /dev/null > values.yaml

# tạo 2 file MẪU
kubectl create configmap nginx-test3-cfg --from-literal=PORT=80 --dry-run=client -o yaml > templates/configmap.yaml
kubectl create deployment nginx-test3-dpl --image=nginx:alpine --replicas=2 --dry-run=client -o yaml > templates/deployment.yaml
VD1: Load tham số .Values từ values.yaml
B1: Chuẩn bị values.yaml
echo 'replicaCount: 5' > values.yaml
B2: Sửa deployment.yaml
vi templates/deployment.yaml
sửa
  replicas: 2
thành:
  replicas: {{ .Values.replicaCount }}
B3: Kết quả
Replicas đã được ghi đè từ 2 lên 5 khi chạy helm template (hoặc install/upgrade)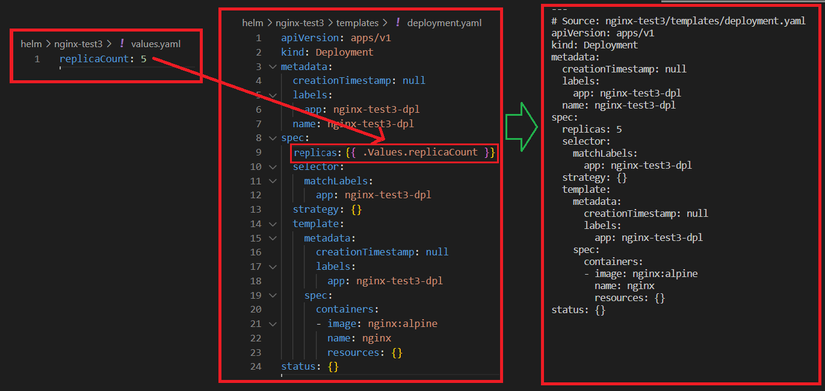
VD2: Load tham số .Chart từ Chart.yaml
B1: values.yaml
replicaCount: 2
image:
  repository: nginx:alpine
B2: Sửa deployment.yaml
apiVersion: apps/v1
kind: Deployment
metadata:
  creationTimestamp: null
  labels:
    app: {{ .Chart.Name }}-dpl
  name: {{ .Chart.Name }}-dpl
spec:
  replicas: {{ .Values.replicaCount }}
  selector:
    matchLabels:
      app: {{ .Chart.Name }}-dpl
  strategy: {}
  template:
    metadata:
      creationTimestamp: null
      labels:
        app: {{ .Chart.Name }}-dpl
    spec:
      containers:
      - image: {{ .Values.image.repository }}
        name: {{ .Chart.Name }}
        resources: {}
B3: Kết quả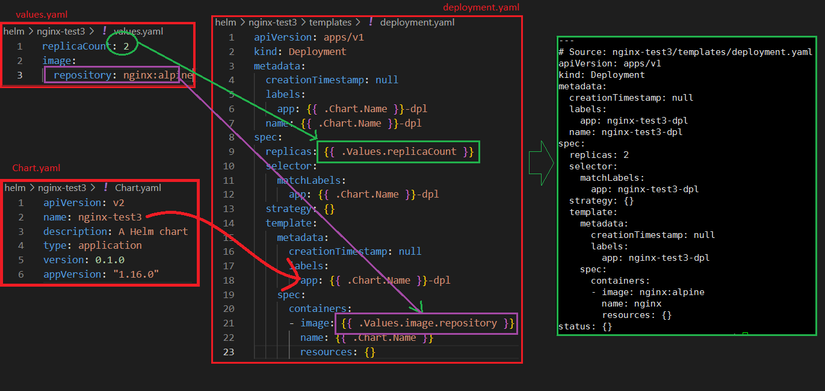
Ngoài ra, ta còn có một số Values, chart build-in có sẵn hay sử dụng:
Release.Name
Chart.Name
Chart.ApiVersion
...
URL: https://helm.sh/docs/chart_template_guide/builtin_objects/
P4: Function và Pipeline
Các Function helm ta có thể tìm ở đây: https://helm.sh/docs/chart_template_guide/function_list/#string-functions
VD1: Function
B1: Sửa file values.yaml và Chart.yaml
# vim values.yaml
replicaCount: 2
image:
  repository: nginx:alpine
-----------------
#vim Chart.yaml
apiVersion: v2
name: nginx-test3
description: A Helm chart for Kubernetes
type: application
version: 0.1.0
appVersion: "1.16.0"
B2: Sửa deployment.yaml. Áp dụng function: upper, title, replace, camelcase...
apiVersion: apps/v1
kind: Deployment
metadata:
  creationTimestamp: null
  labels:
    app: {{ upper .Chart.Name }}-dpl
  name: {{ title .Chart.Name }}-dpl
spec:
  replicas: {{ .Values.replicaCount }}
  selector:
    matchLabels:
      app: {{ replace "nginx" "test" .Chart.Name }}-dpl
  strategy: {}
  template:
    metadata:
      creationTimestamp: null
      labels:
        app: {{ camelcase  .Chart.Name }}-dpl
    spec:
      containers:
      - image: {{ .Values.image.repository }}
        name: {{ .Chart.Name }}
        resources: {}
B3: Kết quả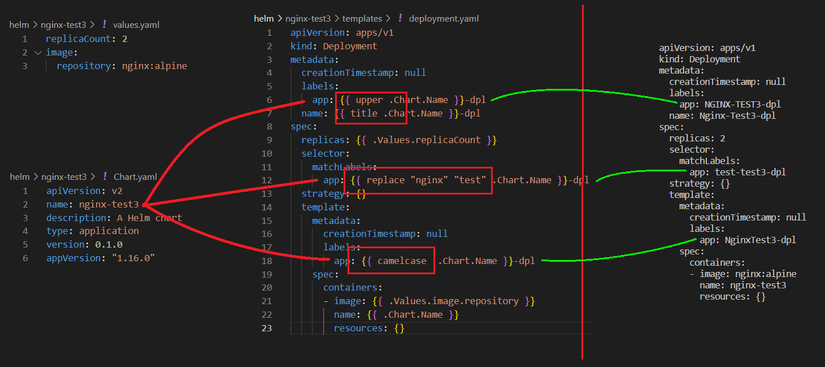
VD2: Pipeline
Pipeline có kêt quả tương tự như function, ta có thể xem ví dụ dưới đây về upper, title, replace, camelcase...
apiVersion: apps/v1
kind: Deployment
metadata:
  creationTimestamp: null
  labels:
    app: {{ .Chart.Name | upper }}-dpl
  name: {{ .Chart.Name | title }}-dpl
spec:
  replicas: {{ .Values.replicaCount }}
  selector:
    matchLabels:
      app: {{ .Chart.Name | replace "nginx" "test" }}-dpl
  strategy: {}
  template:
    metadata:
      creationTimestamp: null
      labels:
        app: {{  .Chart.Name | camelcase }}-dpl
    spec:
      containers:
      - image: {{ .Values.image.repository }}
        name: {{ .Chart.Name }}
        resources: {}
Kết quả: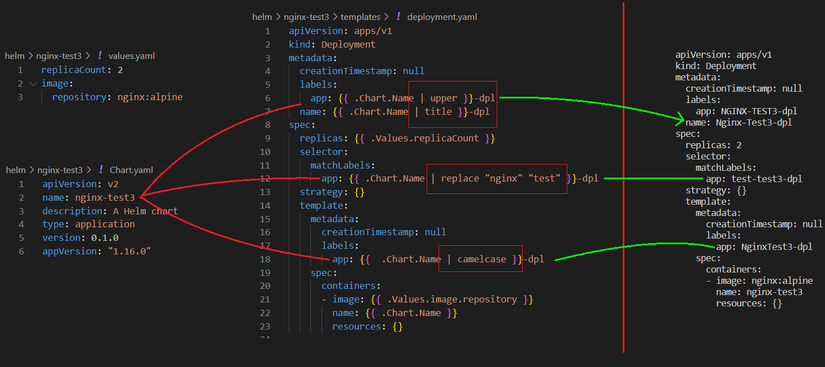
P5: IF
Chức năng: (1) so sánh, (2) Nếu exist sẽ in ra
VD1: Kiểm tra tồn tại bằng if
B1: File values.yaml
replicaCount: 5
B2: Sửa deployment.yaml
spec:
  {{- if .Values.replicaCount }}
  replicas: {{ .Values.replicaCount }}
  {{- end }}
B3: Kết quả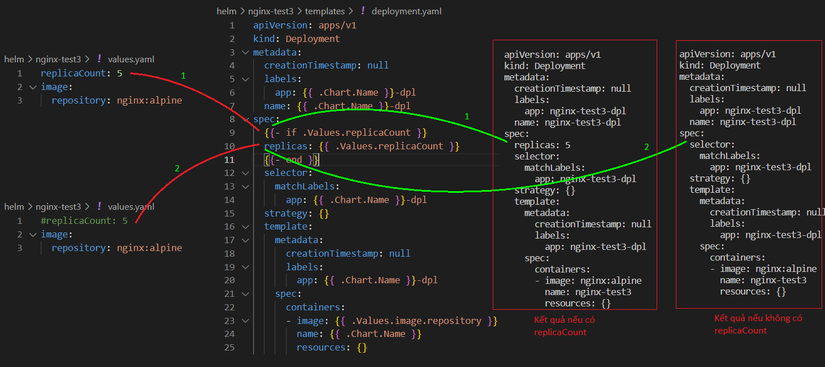
VD2: Các ví dụ so sánh về IF
{{- if and (eq $.Values.service.type "NodePort") .Values.nodePort }}
> nếu service.type là NodePort -VÀ- nodePort=8080 tồn tại thì thực hiện ...

{{- if eq (include "paperless.trash.enabled" .) "true" }}
> nếu template paperless.trash.enabled được khai báo thì thực hiện ...

{{- if or .Values.serverBlock .Values.existingServerBlockConfigmap }}
> nếu tồn tại 1 trong 2 value thì thực hiện ...

{{- if or (eq .Values.service.type "LoadBalancer") (eq .Values.service.type "NodePort") }}
> nếu svc khai báo là "LoadBalancer hoặc NodePort" thì thực hiện ...

{{- if and (or (eq .Values.service.type "NodePort") (eq .Values.service.type "LoadBalancer")) (not (empty .Values.service.nodePorts.http)) }}
      nodePort: {{ .Values.service.nodePorts.http }}
      {{- end }}
P6: With
Chức năng:
- Dùng để rút gọn Chart.
- Kiểm tra tồn tại nếu có thì insert., nếu ko có thì xóa (giống IF).
- Dùng để load 1 list string vào trong Chart.
VD1: Rút gọn Chart
B1: File values.yaml
app:
  mobile:
    account: taikhoan
    password: matkhau
  db:
    max: 15
    min: 5
B2: File configmap.yaml khi chưa sửa
apiVersion: v1
kind: ConfigMap
metadata:
  name: test
data:
  account: {{ .Values.app.mobile.acc }}
  password: {{ .Values.mobile.ui.pwd }}
  max: {{ .Values.app.db.max }}
  min: {{ .Values.app.db.min }}
B3: Sửa configmap.yaml rút gọn ".Values.app." đưa vào with
apiVersion: v1
kind: ConfigMap
metadata:
  name: test
data:
  {{- with .Values.app. }}
  account: {{ .mobile.account }}
  password: {{ .mobile.password }}
  max: {{ .db.max }}
  min: {{ .db.min }}
B4: Kết quả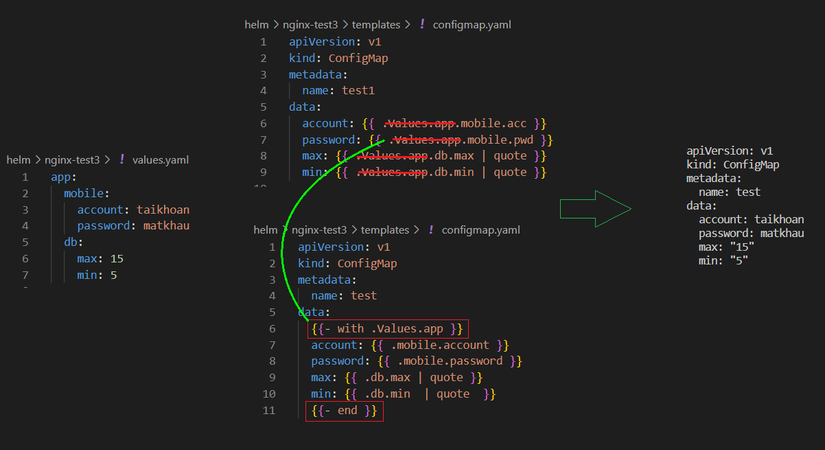
VD2: kiểm tra tồn tại nếu có thì insert., nếu ko có thì xóa (giống IF)
B1: File values.yaml
pod:
  labels:
    app: test
B2: Sửa deployment.yaml
apiVersion: apps/v1
kind: Deployment
metadata:
  {{- with .Values.pod.labels }}
  labels:
    {{ toYaml . }}
  {{- end }}
  name: test
spec:
  replicas: 3
  selector:
    matchLabels:
      app: test
  strategy: {}
  template:
    metadata:
      {{- with .Values.pod.labels }}
      labels:
        {{ toYaml . }}
      {{- end }}
    spec:
      containers:
      - image: nginx
        name: nginx
B3: Kết quả
P7: Range (for i)
Range gần giống như with để load values ra, nhưng sử dụng cho array values. Ta có thể xem ví dụ sau
VD1: Range sử dụng để fill array list
B1: File values.yaml
configMapReload:
  #extraArgs: []
  extraArgs:
    - --webhook-method HEAD
    - --webhook-retries 5
B2: Sửa deployment.yaml
          args:
            - --webhook-url=http://127.0.0.1:{{ .Values.ports.http.port }}/-/reload
          {{- range $i, $val := .Values.configMapReload.extraArgs }}
            - {{ $val }}
          {{- end }}
B3: Kết quả
          args:
            - --webhook-url=http://127.0.0.1:9090/-/reload
            - --webhook-method HEAD
            - --webhook-retries 5
VD2: Range with multi values
B1: File values.yaml
env:
  # -- Timezone for the container.
  - name: TZ
    value: UTC
  - name: VN
    value: GMT
B2: Sửa deployment.yaml
apiVersion: apps/v1
kind: Deployment
metadata:
  labels:
    app: test
  name: test
spec:
  replicas: 3
  selector:
    matchLabels:
      app: test
  strategy: {}
  template:
    metadata:
      labels:
        app: test
    spec:
      containers:
      - image: nginx
        name: nginx
        env:
        {{- range $i, $val := .Values.env }}
        - name: {{ $val.name | quote }}
          value: {{ $val.value | quote }}
        {{- end }}
B3: Kết quả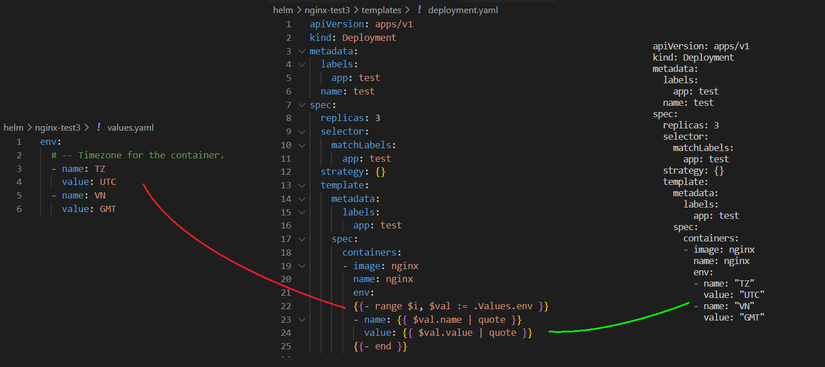
VD3: Range without $val
B1: File values.yaml
configMapReload:
  extraConfigMapMounts:
    - name: alerts
      configMap: prometheus-alerts
      mountPath: /etc/alerts
      subPath: 'test'
B2: Sửa deployment.yaml
        {{- range .Values.configMapReload.extraConfigMapMounts }}
        - name: {{ .name }}
          configMap:
            name: {{ .configMap }}
        {{- end }}
B3: Kết quả
        - name: alerts
          configMap:
            name: prometheus-alerts
P8: Include/Template
helm create self-chart
B1: File _helper.tpl
{{- define "self-chart.labels" -}}
helm.sh/chart: {{ include "self-chart.chart" . }}
{{ include "self-chart.selectorLabels" . }}
{{- if .Chart.AppVersion }}
app.kubernetes.io/version: {{ .Chart.AppVersion | quote }}
{{- end }}
app.kubernetes.io/managed-by: {{ .Release.Service }}
{{- end }}
B2: Trong deployment.yaml có gọi include
apiVersion: apps/v1
kind: Deployment
metadata:
  name: {{ include "self-chart.fullname" . }}
  labels:
    {{- include "self-chart.labels" . | nindent 4 }}
spec:
B3: Kết quả
apiVersion: apps/v1
kind: Deployment
metadata:
  name: release-name-nginx-test3
  labels:
    helm.sh/chart: nginx-test3-0.1.0
    app.kubernetes.io/name: nginx-test3
    app.kubernetes.io/instance: release-name
    app.kubernetes.io/version: "1.16.0"
    app.kubernetes.io/managed-by: Helm
spec:
P9: Print function
B1: File values.yaml
configProperties:
  codeString: dynamic
B2: Sửa configmap.yaml
apiVersion: v1
kind: ConfigMap
data:
  TEST: {{ printf "static-%s" (.Values.configProperties.codeString) -}}
B3: Kết quả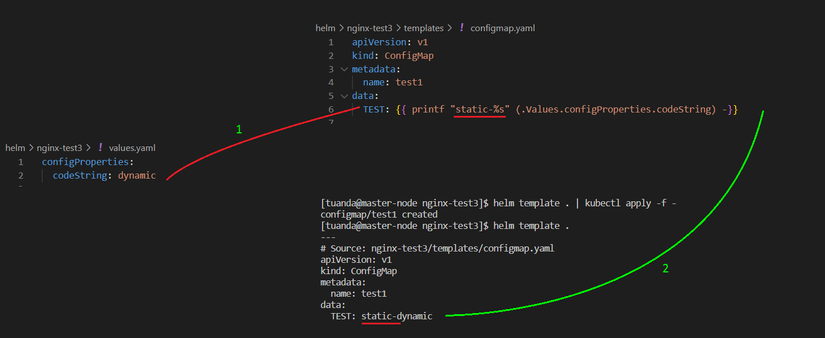
P10: Default
B1: File values.yaml
imageName: tomcat
B2: Sửa deployment.yaml
    spec:
      containers:
      - image: {{- default "nginx" .Values.imageName }}
        name: {{- default "nginx" .Values.imageName }}
        resources: {}
B3: Kết quả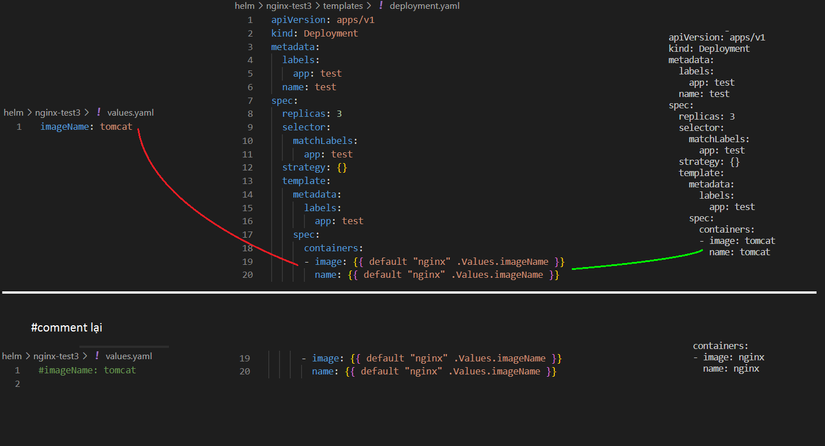
Các bạn có thể tham khảo video của Bizfly khá hay về helm https://www.facebook.com/BizflyCloud.VCCorp/videos/2205618102920117
Bài viết trong phạm vi kiến thức của người viết, có thể các bạn có idea hay hơn, xin hướng dẫn. Cảm ơn!


